New World Aeternum Quick Start: The Essential Guide
The most important thing for any player starting New World Aeternum is understanding that the initial choices are not permanent, allowing you to focus on early progression and build flexibility.
If you want an extra helping hand, you can take a look at our New World Interactive Map: https://metaforge.app/new-world/map/
1. Initial Character and Server Decisions
When creating your character, you will be presented with an Archetype selection, which is merely a starting template and does not lock you into a specific playstyle.

Archetype Selection (Pick What Seems Fun)
- Weapons are Flexible: Unlike traditional MMOs, New World allows you to mix and match any two weapons in the game. If you choose the Soldier archetype for the Sword and Shield but prefer the Warhammer over the Hatchet, you are free to swap the secondary weapon instantly.
- Trade Skill Boosts: The only minor consideration for your starting archetype is the initial +50 boost to a complementary trade skill (e.g., Ranger grants a boost to Skinning and Logging). While this is a small head start, any player can quickly overcome this bonus by simply gathering resources, so it should not be the deciding factor.
- Recommended Starts: If you want a slight edge for the new player experience, the Ranger or Soldier archetypes are generally recommended due to their well-rounded weapon choices and useful trade skill boosts.

Server Choice and Crossplay
The server you select is critical as it dictates who you will play with, especially if you are coordinating with friends.
- Crossplay Recommendation: It is highly recommended that all players—whether on PC, Xbox, or New World PS5 Start—leave Crossplay enabled (found in Settings > Social). Playing on a busy, crossplay server ensures a more active and vibrant world with a better in-game economy for buying and selling items, making the experience feel significantly more alive.
- Spawning with Friends: A common issue is the split starting beach, where friends may spawn at either Monarch’s Bluff or Windsward.
- Rerolling: You can delete and re-create your character, hoping for the desired spawn point, but this is tedious.
- Short Quest Run: The most practical approach is for the player who spawned in the “wrong” location to complete the first 10 minutes of beach quests. Once the game gives you the option to travel to the first major town, simply run to the town where your friends started instead of the suggested one.
- Convergence: The main story questlines from both starting areas converge in the settlement of Everfall around Level 20, at which point all players will naturally meet up.

2. Progression, Factions, and Gearing Up
Once you reach Level 17, your next priority should be joining one of the three Factions (Covenant, Syndicate, or Marauders), which provides crucial access to powerful leveling gear and PvP mechanics.
Joining a Faction
- Initiation Quests: Around Level 17, look for the faction initiation quests which are distinct purple, green, or yellow/orange quest markers found near settlements like Everfall and Oxboro.
- Faction Representatives: After completing the quest chain and formally joining a Faction, you gain access to the Faction Representative NPC in all major settlements.
- Leveling Gear Advantage: The Rewards tab at the Faction Representative allows you to purchase weapons and armor using gold and Faction Tokens (earned from faction quests). This is one of the only ways to buy gear directly from an NPC in Aeternum. This gear is often an incredibly strong and reliable way to stay properly geared as you level up to the maximum level.

Player vs. Player (PvP)
- Flagging Up: To engage in PvP outside of the 3v3 Arena (which is introduced via Maximus), you must Faction Flag for PvP. This is done by holding up on the D-pad and pressing L1/LB or simply pressing ‘U’ on a mouse and keyboard.
- Group Requirement: When flagged, you can only party up and play with players who are in your same Faction. If you plan to PvP with friends, ensure you all choose the same faction.
- Non-Mandatory: Joining a faction does not force you to participate in PvP or mean you will be attacked by other players. It is only a requirement if you wish to flag up.
3. Essential Mechanic: Armor and Equip Load Ratios
The single most confusing but critical mechanic for new players is how their armor weight affects their dodge ability, speed, and survivability. Understanding the Equip Load threshold is mandatory for maximizing your defensive capabilities.
The Three Dodge Rolls
Your dodge ability changes based on your total Equip Load (the collective weight of your five armor slots and two weapons):
- Light Load (Roll): Grants a far-reaching dodge roll and a passive 20% damage bonus. This is generally the preferred option for pure damage dealers.
- Medium Load (Hop): Grants a shorter dodge hop and a passive 10% damage bonus, while significantly boosting armor rating. This is the choice for bruisers and hybrid builds.
- Heavy Load (Duck): Grants a stationary duck/sidestep. Provides the highest armor rating but has no passive damage bonus and severely limits mobility.

Optimizing Your Equip Load (The Secret to Survivability)
Many new players incorrectly assume they need to wear a full set of Light armor to achieve a Light Equip Load, making them extremely squishy. The key is to find the maximum possible weight you can wear while staying just under the threshold for the next tier.
- Light Equip Load Optimization (High Damage, More Defense):
- To get the highly mobile dodge roll and 20% damage bonus, you must stay under 13.0 total weight.
- The optimal configuration involves replacing the lightest piece of gear with a heavier one: wear a Medium Chestpiece and make everything else (Helmet, Gloves, Legs, Boots) Light.
- The Benefit: A Medium Chest provides nearly 100 extra points of physical and elemental armor compared to a Light Chest, which is a massive increase in survivability that can save your life in a tough fight, all while retaining the quick dodge roll.
- Medium Equip Load Optimization (High Defense, Good Mobility):
- To get the hop and 10% damage bonus, you must stay under 23.0 total weight.
- The optimal configuration is a mix of Heavy and Medium pieces to maximize the total armor rating:
- Heavy Helmet
- Heavy Chest
- Medium Gloves
- Light Legs
- Medium Boots
- This combination puts you right on the brink of the Heavy threshold, giving you the maximum possible armor while retaining the beneficial Medium dodge hop.

4. Leveling to the Max Cap
For the purposes of a quick start, the most efficient path to the maximum level of 65 is simply to follow the main story questline.
- Quest Efficiency: The main story grants the largest amount of experience (XP) and guides you logically through the different zones, starting from Windsward or Monarch’s Bluff, converging in Everfall, and proceeding to Brightwood and Weaver’s Fen.
- Beyond Leveling: Following the main story is also required to unlock the Aeturnum Wilds, which is a critical zone for players when they hit the level cap. While other activities like killing enemies or gathering trade skills give XP, nothing rivals the speed and mandatory unlocks of the main quest.
5. Reaching the Level Cap and Focusing on Gear Perks
Once you’ve hit Level 65, finished the main story, and explored the Aeturnum Wilds, the game’s focus shifts entirely to endgame activities and gearing.
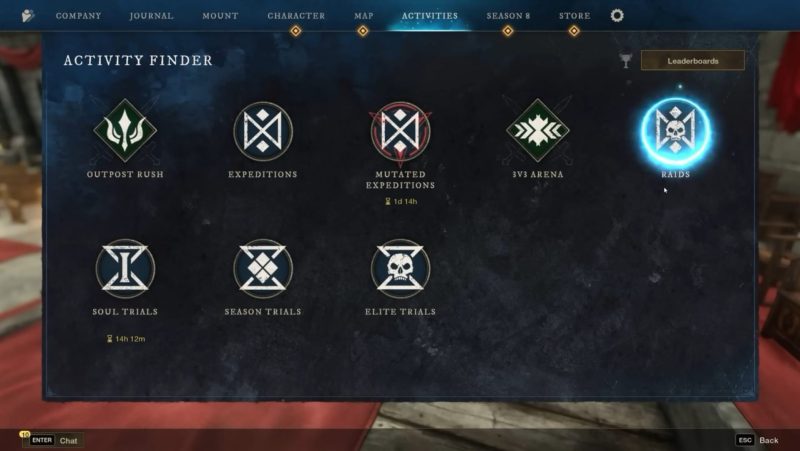
Endgame Activities and Builds
At this point, you should first continue to do what you find fun, whether that’s crafting, gathering, or finishing side quests. However, if your goal is to tackle challenging activities like Mutated Expeditions or the Hive of Gorgon’s Raid, you will need to start focusing on meta-oriented builds.
- Gold Farming: Participating in activities like Mutated Expeditions can be profitable. Players queuing as a Tank or Healer receive bonus gold, making it a reliable way to earn up to 3,000 gold twice a day through random queuing.
- Build Necessity: While you can play any build for low-difficulty content, clearing the most challenging content (Difficulty 2, 3, or the final Raid) will require you to use weapons and gear that are recognized for their effectiveness against specific bosses.
The Best New World Gear Perks to Prioritize
The single most important lesson for Level 65 gearing is that Perks always outweigh Gear Score (GS). A piece of armor with perfect perks but a slightly lower GS is exponentially better than a piece of high-GS armor with bad perks. You should be actively looking for the following Best New World Gear Perks on your endgame items:
- Enchanted Ward (Armor): This is a mandatory, high-priority perk for every single build. It significantly reduces incoming damage from both AI enemies (PvE) and other players (PvP), offering a massive boost to overall survivability.
- Refreshing (Armor): This perk helps reduce cooldowns on your abilities, allowing you to use your most powerful attacks and defensive skills more frequently.
- Hearty (Ring Only): This is a basically mandatory perk on your Ring. Hearty grants you an additional 10% stamina.
- The Impact: Without Hearty, players can typically dodge only twice before running out of stamina (going from 100 to 0). With Hearty equipped, you can dodge three times in quick succession. This extra dodge can often be the difference between life and death in challenging PvE encounters or PvP duels.
Prioritize finding a Ring with Hearty, and look for armor with Enchanted Ward and Refreshing. Focusing on these core perks will establish a strong foundation for your endgame journey in Aeternum.